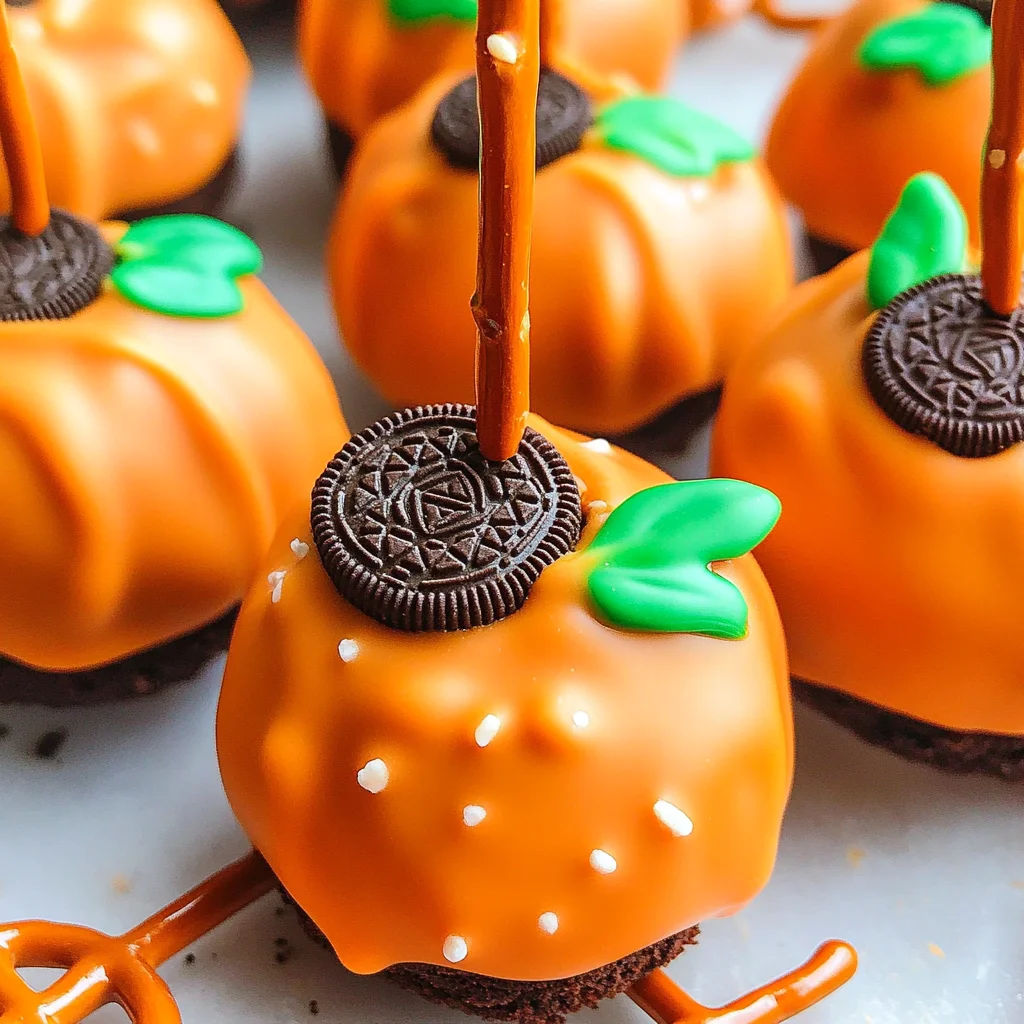
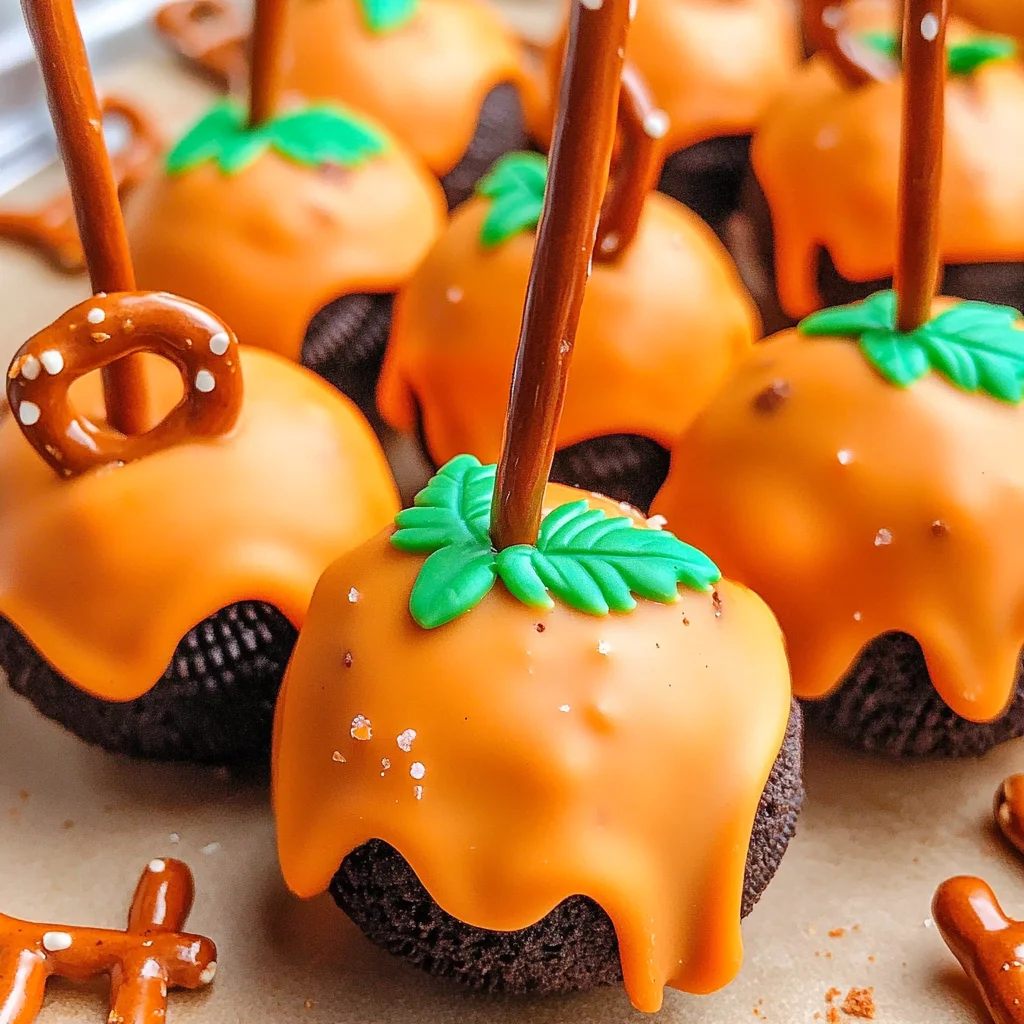
Pumpkin Oreo Balls
If you’re looking for a delightful treat that brings a touch of fall to any gathering, then you’ve stumbled upon the perfect recipe: Pumpkin Oreo Balls! These no-bake delights are not only simple to make but also bring a delightful burst of pumpkin flavor that everyone will adore. Whether you’re hosting a party, celebrating Halloween, or just want a sweet snack after dinner, these little bites of joy are always a hit!
What makes this recipe special is how easy it is to whip up with your family or friends. Kids love getting involved in the decorating process, and it’s such a fun way to create memories together. Plus, they look so festive with their orange coating and cute pretzel stems that they’ll be the star of the dessert table!
Why You’ll Love This Recipe
- Quick and Easy: Perfect for busy schedules, these treats come together in no time without any baking!
- Family-Friendly Fun: Everyone can get involved in making and decorating these adorable pumpkin bites.
- Make-Ahead Convenience: Prepare them in advance and keep them in the fridge for a tasty dessert whenever you need it.
- Deliciously Flavorful: The combination of creamy filling and crunchy cookie creates a delightful texture and taste.
- Festive Appeal: With their cute pumpkin design, they make any occasion feel special!
Ingredients You’ll Need
These Pumpkin Oreo Balls are made with simple, wholesome ingredients that you probably already have on hand. Gather them up, and let’s get started on this delicious adventure!
For the Pumpkin Oreo Balls
- 36 Oreo cookies
- 8 oz cream cheese (softened)
- 12 oz orange candy melts
Variations
This recipe is flexible, allowing you to customize it according to your taste or dietary preferences. Here are some fun variation ideas to try:
- Swap the cookies: Use gluten-free Oreo cookies if you need a gluten-free option.
- Add spices: Mix in some cinnamon or nutmeg to the cream cheese for extra fall flavor.
- Change the coating: Try using dark chocolate or milk chocolate instead of orange candy melts for a different taste.
- Decorate differently: Get creative with sprinkles or edible glitter for added flair instead of pretzel stems.
How to Make Pumpkin Oreo Balls
Step 1: Crumble the Oreos
First things first! We need to transform those lovely Oreos into fine crumbs. Using a food processor makes this super easy—just pulse until you have a sand-like texture. This step is crucial because it helps create that perfect base for our creamy filling.
Step 2: Mix in Cream Cheese
Now, add the softened cream cheese to your crumbled Oreos. Mix until everything is well combined; it should form a thick, moldable dough. This mixture gives our Pumpkin Oreo Balls their rich and creamy texture—totally irresistible!
Step 3: Shape the Balls
Use your hands (or a scoop) to form 1-inch balls from the mixture. Place them on a parchment-covered baking sheet. Then pop them in the fridge for about 15 minutes; this helps them firm up so they hold their shape when we dip them in chocolate.
Step 4: Score Lines for Pumpkin Ridges
Once chilled, take each ball out and use a toothpick to gently score lines into each one. This step is all about creating that pumpkin look! After scoring, return them to the fridge for another 10 minutes.
Step 5: Melt the Chocolate
While they chill again, melt your orange candy melts according to package directions—either over a double boiler or in the microwave works great! Melting properly ensures they coat smoothly.
Step 6: Coat and Decorate
Dip each chilled Pumpkin Oreo Ball into the melted orange chocolate. Shake off any excess chocolate before placing it back on your lined baking sheet. Don’t forget to decorate immediately with a small pretzel stick as a stem and green icing leaves. It’s this playful touch that makes them truly special!
Step 7: Chill Until Ready to Serve
Finally, return your decorated Pumpkin Oreo Balls to the refrigerator until you’re ready to serve them. They’ll be nice and cold—perfectly sweet and ready for all your guests to enjoy!
Now you’re all set! Enjoy making these delightful treats as much as I do!
Pro Tips for Making Pumpkin Oreo Balls
Creating the perfect Pumpkin Oreo Balls is a delightful journey; here are some tips to make sure yours turn out just right!
-
Use room temperature cream cheese – This ensures a smoother mixture, making it easier to combine with the crumbled Oreos and resulting in a creamy texture that holds together beautifully.
-
Chill before dipping – Refrigerating the balls before dipping them in chocolate helps them maintain their shape and prevents them from falling apart while being coated.
-
Work quickly with the melted chocolate – The candy melts can start to set quickly, so it’s best to dip and decorate your pumpkin balls promptly for a perfect finish.
-
Experiment with decorations – While pretzel sticks and leaf icing are fantastic, feel free to get creative! Use colored sprinkles or edible glitter for a fun twist that makes these treats even more festive.
-
Store properly – Keep your Pumpkin Oreo Balls in an airtight container in the refrigerator. They stay fresh for up to a week, making them perfect for meal prep or holiday gatherings.
How to Serve Pumpkin Oreo Balls
These adorable Pumpkin Oreo Balls not only taste amazing but also make a wonderful presentation at any gathering. Here are some ideas to serve them up in style:
Garnishes
-
Crushed graham crackers – Sprinkling crushed graham crackers around your serving platter adds a touch of texture and enhances the pumpkin flavor.
-
Cinnamon dusting – A light dusting of cinnamon on top can elevate the dessert with a warm spice note, making them even more inviting.
Side Dishes
-
Autumn salad – A fresh salad with mixed greens, cranberries, walnuts, and a light vinaigrette pairs wonderfully with these sweet bites, balancing flavors beautifully.
-
Pumpkin soup – A warm bowl of creamy pumpkin soup complements the dessert perfectly, offering a savory counterpoint that makes for a cozy meal experience.
-
Apple slices with caramel dip – Fresh apple slices served alongside a rich caramel dip create an irresistible combination of flavors and textures that everyone will love.
These thoughtful serving suggestions will surely impress your guests and make your Pumpkin Oreo Balls the star of any dessert table! Enjoy creating this delightful treat!
Make Ahead and Storage
These Pumpkin Oreo Balls are not just a delightful treat; they’re also perfect for meal prep! You can whip up a batch ahead of time, making them an excellent option for parties, family gatherings, or simply to satisfy your sweet tooth throughout the week.
Storing Leftovers
- Store leftover Pumpkin Oreo Balls in an airtight container.
- Keep them in the refrigerator where they’ll stay fresh for up to one week.
- For best texture and flavor, consume them within a few days.
Freezing
- To freeze Pumpkin Oreo Balls, place them in a single layer on a baking sheet and freeze until solid.
- Once frozen, transfer them to an airtight container or freezer bag.
- They can be stored in the freezer for up to three months. Thaw in the refrigerator before serving.
Reheating
- These treats are best enjoyed cold or at room temperature.
- If you prefer them slightly warmed, let them sit out for about 10-15 minutes before serving.
- Avoid microwave reheating as it may alter their texture.
FAQs
Here are some common questions about making Pumpkin Oreo Balls!
Can I make pumpkin oreo balls without cream cheese?
Yes! You can substitute the cream cheese with a vegan alternative such as coconut cream or dairy-free cream cheese for a delicious option.
How long do pumpkin oreo balls last?
When stored properly in the refrigerator, pumpkin oreo balls can last up to one week. Enjoy them while they’re fresh!
What is the best way to decorate pumpkin oreo balls?
Decorate your pumpkin oreo balls with melted orange chocolate and top them with pretzel sticks and green icing to resemble leaves. Get creative with your designs!
Can I use different flavors of candy melts?
Absolutely! While orange is ideal for that classic pumpkin look, you can experiment with other colors and flavors of candy melts to create fun variations.
Are pumpkin oreo balls gluten-free?
If you use gluten-free Oreo cookies, then yes, your pumpkin oreo balls can be made gluten-free too! Just double-check the packaging to be sure.
Final Thoughts
I hope this recipe brings joy and sweetness into your kitchen! These Pumpkin Oreo Balls are not only easy to make but also a fun way to get everyone involved in the kitchen. Whether you’re celebrating a special occasion or just want a tasty treat, I’m sure you’ll love making these delightful bites. Enjoy creating and sharing these little pieces of happiness!
Pumpkin Oreo Balls

If you’re searching for a delightful and festive treat to brighten up your gatherings, look no further than these Pumpkin Oreo Balls! These no-bake bites are bursting with pumpkin flavor, making them perfect for any fall celebration or cozy evening at home. Simple to prepare and fun to decorate, they invite creativity in the kitchen—making them an ideal family activity. With their charming pumpkin design and creamy filling, these treats are sure to become a favorite among guests of all ages. Whether you’re hosting a Halloween party or just want a sweet snack, these Pumpkin Oreo Balls will steal the show!
- Prep Time: 30 minutes
- Cook Time: 0 minutes
- Total Time: 30 minutes
- Yield: Approximately 20 servings 1x
- Category: Dessert
- Method: No-Bake
- Cuisine: American
Ingredients
- 36 Oreo cookies
- 8 oz cream cheese (softened)
- 12 oz orange candy melts
Instructions
- Crumble the Oreos in a food processor until fine.
- Mix the crumbled Oreos with softened cream cheese until well combined.
- Shape the mixture into 1-inch balls and place on parchment paper; chill for 15 minutes.
- Score lines into each ball with a toothpick to create a pumpkin effect, then chill again for 10 minutes.
- Melt the orange candy melts according to package instructions.
- Dip each ball into the melted chocolate, shake off excess, and decorate with pretzel sticks as stems.
- Chill again until ready to serve.
Nutrition
- Serving Size: 1 serving
- Calories: 120
- Sugar: 10g
- Sodium: 50mg
- Fat: 7g
- Saturated Fat: 4g
- Unsaturated Fat: 2g
- Trans Fat: 0g
- Carbohydrates: 14g
- Fiber: 0g
- Protein: 1g
- Cholesterol: 15mg