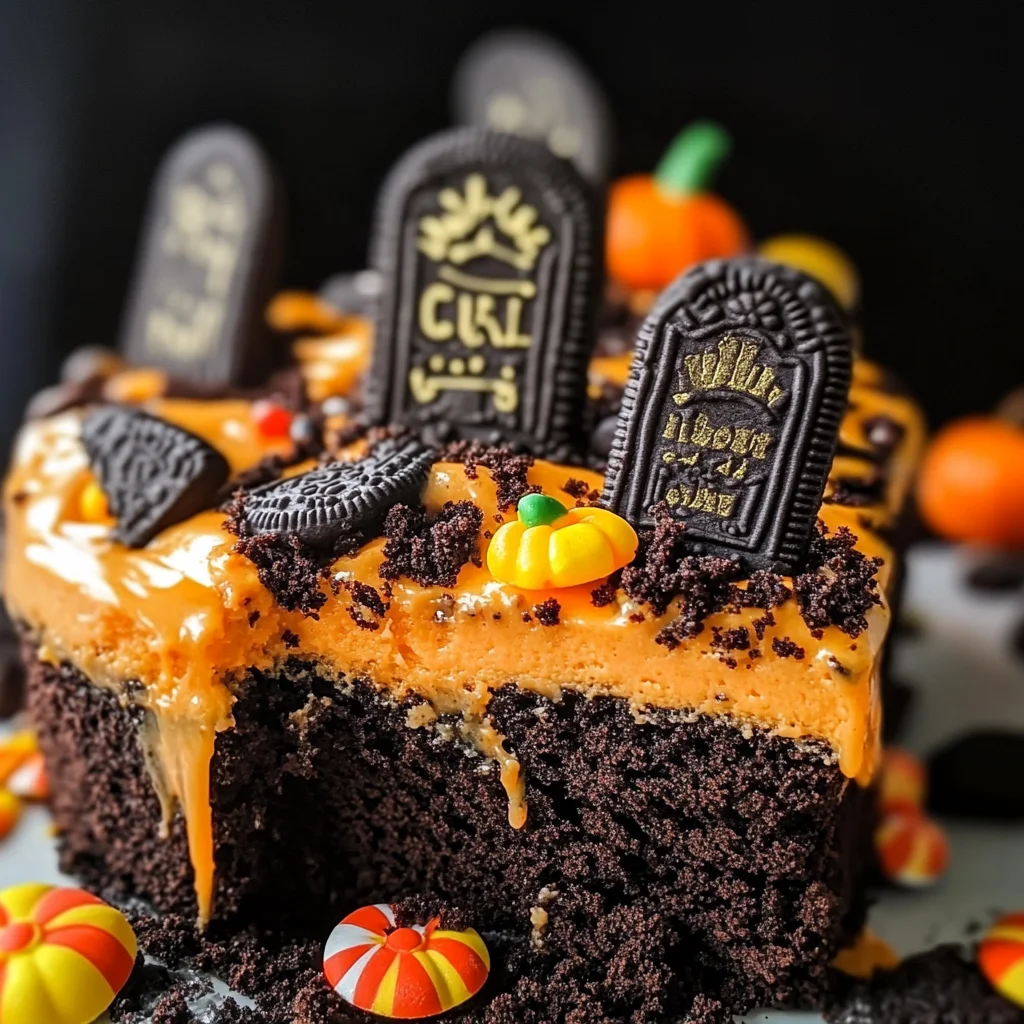
Halloween Graveyard Cake Recipe
If you’re looking for a fun and spooky treat to celebrate Halloween, then this Halloween Graveyard Cake Recipe is just what you need! This delightful dessert combines layers of moist chocolate cake with creamy vanilla pudding and crunchy Halloween Oreo cookies. It’s a fantastic way to bring some festive fun to your family gatherings or even a cozy night in with the kids. Plus, it’s so easy to make that even the littlest hands can help!
This cake isn’t just delicious; it’s also visually striking! Your loved ones will be amazed by the creepy-cute decorations that turn this simple poke cake into a Halloween masterpiece. Whether you’re hosting a party or simply want to enjoy some frightfully good dessert, this recipe is sure to impress.
Why You’ll Love This Recipe
- Effortless Preparation: You can whip up this cake in no time! With just a few simple steps, you’ll have a show-stopping dessert ready to chill.
- Family-Friendly Fun: Get the kids involved in decorating! They’ll love helping to create their very own spooky graveyard scene.
- Make-Ahead Convenience: Prepare it ahead of time and let it chill in the fridge. That way, you can relax before your guests arrive!
- Deliciously Decadent: The combination of chocolate cake and creamy pudding makes every bite rich and satisfying.
- Customizable Presentation: Feel free to get creative with your toppings and decorations – there’s no limit to how spooky or cute you can make it!

Ingredients You’ll Need
Gathering these ingredients is part of the fun! They are simple and wholesome, making it easy for you to create this delicious dessert. Here’s what you’ll need for your Halloween Graveyard Cake:
For the Cake
- Chocolate Cake mix
- Ingredients as required on the box
For the Pudding Layer
- 5.1 ounce box vanilla instant pudding
- 2 cups skim milk (for pudding)
- Orange Gel Food coloring
For the Topping
- 15 Oreos (ground into crumbs)
- 12 Milano cookies
- Frosting or Edible Markers
- Pectin-based gummy candies, Candy Corn Pumpkins, Peeps Ghosts (optional)
Variations
One of the best things about this recipe is its flexibility! Feel free to switch things up based on what you have on hand or your personal taste preferences.
- Try different cake flavors: Instead of chocolate, use vanilla or any other flavor you love!
- Add extra layers: Incorporate a layer of fruit between the pudding and cookies for a refreshing twist.
- Make it gluten-free: Use gluten-free chocolate cake mix and ensure all other ingredients are certified gluten-free.
- Go wild with toppings: Use gummy worms, spider candies, or even crushed candy bars for an added crunch!
How to Make Halloween Graveyard Cake Recipe
Step 1: Prepare the Cake
Begin by preparing your chocolate cake according to the package directions. Spread it into a 9×13 glass baking dish that’s been coated with cooking spray. Bake for the least amount of suggested time. This step is crucial because underbaking slightly keeps the cake moist, allowing it to soak up all that delicious pudding later on!
Step 2: Poke Holes in the Cake
Once your cake has baked and cooled slightly, grab the end of a wooden spoon or a straw and poke holes generously all over. The more holes you make, the more room there is for that creamy pudding goodness to seep in—trust me; it’s worth it!
Step 3: Whisk Together Pudding
While your cake cools completely, whisk together the vanilla instant pudding mix with skim milk and orange gel food coloring until well combined but still slightly runny. This ensures that when you pour it over the warm cake, it sinks beautifully into those holes.
Step 4: Pour Pudding Over Cake
Carefully pour the pudding mixture over your poked cake, gently patting down into those holes so every bite is packed with flavor. Give the dish a couple of taps on the counter to help distribute everything evenly.
Step 5: Crush Oreos for Topping
Next up is preparing those crunchy Oreo crumbs! Place your Oreos in a large freezer bag and crush them using a rolling pin or pulse them in a food processor until they resemble fine crumbs.
Step 6: Let It Chill
Cover your creation with plastic wrap and let it chill in the refrigerator for at least one hour. This allows everything to meld together beautifully while keeping that delightful texture.
Step 7: Add Oreo Crumbles
Once chilled, spread those Oreo crumbs over your pudding layer and pat them down gently. Remember not to top until you’re ready to serve so those cookies stay wonderfully crunchy!
Step 8: Decorate Your Graveyard Scene
Grab those Milano cookies and use frosting or edible markers to write fun RIP messages or names on them as gravestones. Stick them upright in various spots on top of your cake along with any gummy candies like Peeps ghosts or candy corn.
Step 9: Enjoy!
Now that you’ve created this spooky masterpiece, slice up your Halloween Graveyard Cake and enjoy every bite! If you’ve tried this recipe, come back and let us know how much fun you had making it in the comments below!
Pro Tips for Making Halloween Graveyard Cake Recipe
Creating a spooky and delicious Halloween Graveyard Cake is easier than you might think, especially with these handy tips!
-
Choose the right cake mix: Opt for a high-quality chocolate cake mix for a richer flavor that pairs perfectly with the pudding and cookies. The better the base, the more impressive your cake will be!
-
Poke holes generously: Make sure to poke enough holes in your cake to allow the pudding to seep in. This ensures every bite is packed with creamy goodness, creating that delightful texture you want.
-
Cool before adding pudding: Allow your cake to cool slightly before pouring in the pudding. If it’s too hot, the pudding may not set well, leading to a less-than-ideal consistency.
-
Keep Oreo crumbles crunchy: Add the crushed Oreos just before serving. This keeps them from getting soggy and maintains that satisfying crunch when guests dig into the cake.
-
Be creative with decorations: Don’t hesitate to let your imagination run wild! Use different edible markers or candies to create a unique graveyard scene that reflects your style.
How to Serve Halloween Graveyard Cake Recipe
When it comes to serving this festive dessert, presentation is key! Here are some ideas to make this spooky treat stand out on your table.
Garnishes
- Edible glitter: Sprinkle a bit of edible glitter over your cake for a magical touch that catches the light and enhances the Halloween spirit.
- Chocolate spider webs: Drizzle melted white chocolate in a spider web pattern on top of the Oreos for an extra creepy effect.
- Fresh mint leaves: Add a few fresh mint leaves around the edges for a pop of color and a refreshing contrast to the rich flavors.
Side Dishes
- Pumpkin Soup: A warm and creamy pumpkin soup makes for an excellent starter, complementing the sweet flavors of the cake without overwhelming them.
- Roasted Veggies: A medley of roasted vegetables adds a savory balance to your meal. Try carrots, bell peppers, and zucchini tossed in olive oil and herbs.
- Apple Salad: A crisp apple salad with nuts and dried cranberries provides a refreshing crunch that pairs beautifully with dessert.
- Cheese Platter: Offer an assortment of cheeses alongside crackers and fruits for guests who may prefer something savory before indulging in sweets.
Now you’re ready to create not just a dish, but an experience! Enjoy making this Halloween Graveyard Cake and delight your friends and family with its fun presentation and delicious flavor. If you try this recipe, don’t forget to come back and share how it turned out!
Make Ahead and Storage
This Halloween Graveyard Cake is not only a fun treat to make, but it’s also perfect for meal prep! You can easily prepare it ahead of time for parties or gatherings, ensuring that you have a delicious dessert ready when you need it.
Storing Leftovers
- Store any leftover cake in an airtight container in the refrigerator.
- The cake is best enjoyed within 3-4 days for optimal taste and texture.
- If the Oreo topping becomes soft, consider adding fresh cookie crumbs before serving.
Freezing
- While this cake is best served fresh, you can freeze individual portions if needed.
- Wrap slices tightly in plastic wrap and then place them in a freezer-safe container.
- Thaw in the refrigerator overnight before enjoying.
Reheating
- This cake is typically served cold or at room temperature.
- If you prefer it warm, microwave individual servings for about 10-15 seconds until slightly warmed.
FAQs
Have questions about this spooky dessert? Here are some common inquiries!
Can I use a different flavor of cake mix for the Halloween Graveyard Cake Recipe?
Absolutely! You can swap out the chocolate cake mix for any flavor you prefer, such as vanilla or pumpkin spice. Just keep in mind that the pudding and Oreo flavors will still add a chocolatey twist to your dessert.
How can I make this Halloween Graveyard Cake Recipe gluten-free?
To make this recipe gluten-free, simply use a gluten-free chocolate cake mix and ensure that all other ingredients, including the Oreo cookies, are certified gluten-free. This way, everyone can enjoy this festive treat!
What type of pudding works best for the Halloween Graveyard Cake Recipe?
Vanilla instant pudding is ideal for this recipe, as it complements the chocolate cake nicely. However, feel free to experiment with other flavors like chocolate or butterscotch for a unique twist!
Can I decorate the Halloween Graveyard Cake differently?
Definitely! Get creative with your decorations. Use different types of candies or toppings to personalize your graveyard scene. You can even add edible flowers or spooky sprinkles for an extra touch!
Final Thoughts
I hope you’re as excited to make this Halloween Graveyard Cake as I am! It’s not just a dessert; it’s an experience filled with fun and creativity. Whether you’re serving it at a party or enjoying it with family, it’s sure to bring smiles all around. Enjoy making your spooky masterpiece and don’t forget to share how it turned out—your feedback is always appreciated!
Halloween Graveyard Cake

If you’re looking to add some festive flair to your Halloween celebrations, this Halloween Graveyard Cake Recipe is a must-try! This delightful dessert features layers of moist chocolate cake, creamy vanilla pudding, and crunchy Oreo cookie crumbs. It’s a fun, spooky treat that’s perfect for family gatherings or cozy nights in with the kids. Not only is it easy to prepare, but it also invites creativity in decorating—allowing little hands to help create their very own graveyard scene. With its rich flavors and eye-catching presentation, this cake is sure to impress guests of all ages!
- Prep Time: 20 minutes
- Cook Time: 25 minutes
- Total Time: 45 minutes
- Yield: Serves 12
- Category: Dessert
- Method: Baking
- Cuisine: American
Ingredients
- Chocolate cake mix
- Vanilla instant pudding
- Skim milk
- Orange gel food coloring
- Ground Oreo cookies
- Milano cookies
- Pectin-based gummy candies (optional)
Instructions
- Prepare the chocolate cake mix according to package instructions and bake in a 9×13 dish.
- Once cooled slightly, poke holes all over the cake with a wooden spoon or straw.
- In a bowl, whisk together vanilla pudding mix with skim milk and orange gel food coloring until combined.
- Pour the pudding mixture over the poked cake, ensuring it seeps into the holes.
- Crush Oreo cookies into fine crumbs and let the cake chill in the refrigerator for at least an hour.
- Spread crushed Oreos on top before serving and decorate with Milano cookies as gravestones.
Nutrition
- Serving Size: 1 serving
- Calories: 290
- Sugar: 18g
- Sodium: 250mg
- Fat: 10g
- Saturated Fat: 4g
- Unsaturated Fat: 6g
- Trans Fat: 0g
- Carbohydrates: 45g
- Fiber: 1g
- Protein: 4g
- Cholesterol: 15mg