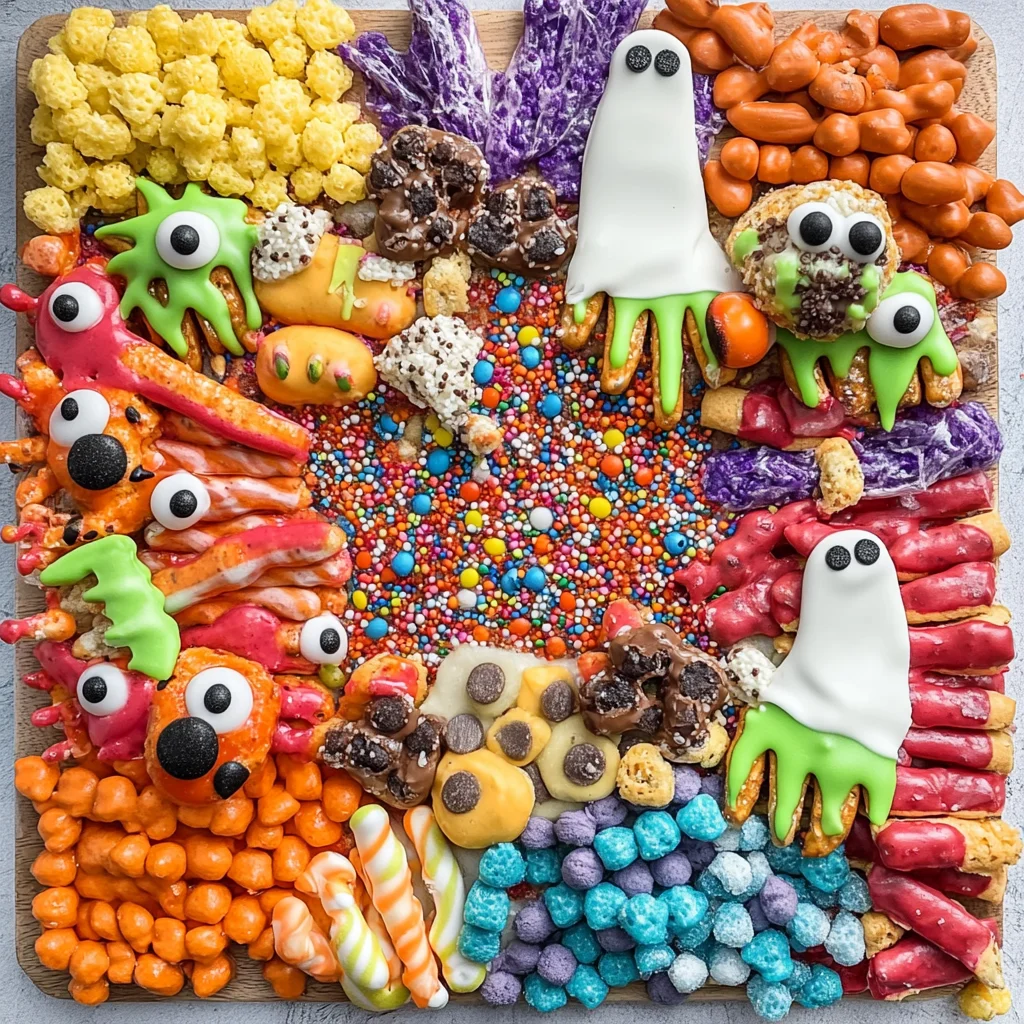
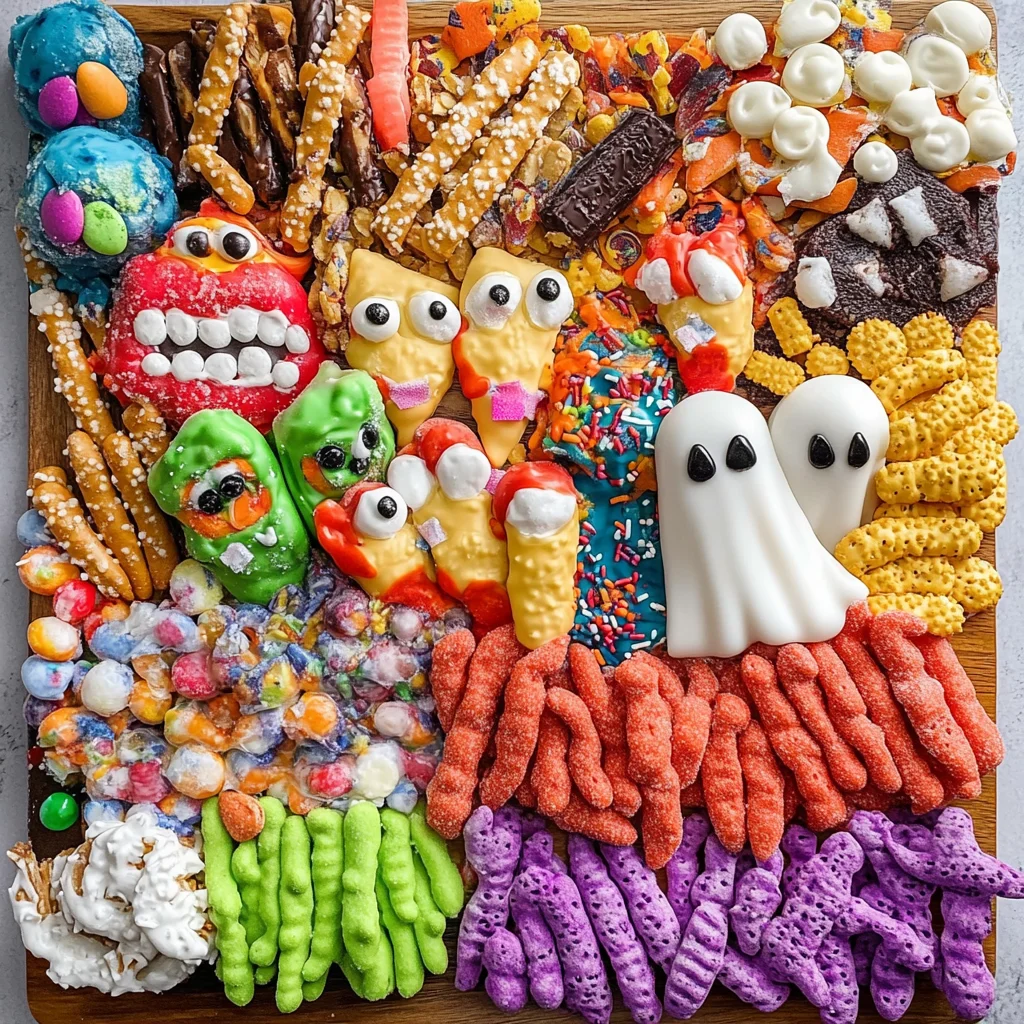
Halloween Charcuterie Board
If you’re looking for a fun and festive way to celebrate Halloween, this Halloween Charcuterie Board is just what you need! This delightful spread is not only visually appealing, but it also brings together all the sweet treats that kids (and adults!) adore. Picture a spooky skeleton centerpiece surrounded by whimsical chocolate-dipped “creatures” and colorful candies. It’s a sure way to brighten up your Halloween parties or cozy movie nights.
What I love most about this Halloween Charcuterie Board is how easy it is to prepare. You can involve the kids in assembling their favorite treats, making it a memorable family activity. Plus, it’s easily scalable—whether you’re hosting a large gathering or just a small get-together, you can adjust the quantities to suit your needs.
Why You’ll Love This Recipe
- Super easy to make: No fancy skills required! Just melt, dip, and decorate.
- Kid-friendly fun: Involving kids in preparation makes for delightful memories and delicious results.
- Colorful and festive: Your board will be bursting with vibrant colors that scream Halloween!
- Mix and match: Customize with your favorite candies or treats for a personal touch.
- Perfect for any occasion: Whether it’s a party or a quiet night in, this board fits right in.
Ingredients You’ll Need
This Halloween Charcuterie Board uses simple, wholesome ingredients that you can easily find at your local store. Let’s gather our supplies and get ready for some spooky fun!
For the Monsters
- 8 rice krispie treats
- 5 ounces white chocolate melting wafers
- purple food dye
- candy eyes
- purple sprinkles
For the Witch Fingers
- 8 pretzel rods
- 10 ounces white chocolate melting wafers
- green food dye
- sliced almonds
For the Ghosts
- 8 Nutter Butter cookies
- 5 ounces white chocolate melting wafers
- mini chocolate chips
For the Bats
- 8 Mini Reese’s Cups
- 8 Oreo Thins
For Filling the Board
- 18 ounces Smarties
- 16 ounces red licorice
- 15 ounces Assorted Hershey’s Candy
- 28 ounces sour pectin-based gummy candies
- 40 ounces candy corn
Variations
This recipe is incredibly flexible! Feel free to get creative with what you have on hand or personal preferences.
- Swap out the nuts: If allergies are a concern, leave out the sliced almonds or use another topping like pumpkin seeds instead.
- Change up the sweets: Use different types of candies like gummy worms or chocolate-covered pretzels for variety.
- Add seasonal fruits: Consider including some fresh fruit like grapes or strawberries for an unexpected twist.
- Make it savory: If you want to include some savory items, think about adding cheese cubes or crackers alongside the sweets.
How to Make Halloween Charcuterie Board
Step 1: Make the Monster Treats
Start by melting the white chocolate wafers in a microwave-safe bowl. Follow the instructions on the package to ensure they melt perfectly. Once melted, mix in purple food dye until you achieve your desired color. Dip one side of each rice krispie treat into this colorful chocolate, then sprinkle on candy eyes and purple sprinkles to give them a fun hair look. Place them on parchment paper and let them set—these monsters will steal the show!
Step 2: Create Witch Fingers
For these spooky fingers, melt more white chocolate wafers and add green food dye as before. Pour the melted mixture into a tall cup so it’s easier to dip. Dip each pretzel rod into the green chocolate and place a sliced almond at one end to resemble a fingernail. Set them aside on parchment paper to harden—these will add an eerie touch!
Step 3: Assemble Ghosts
Melt another batch of white chocolate wafers. Dip one side of each Nutter Butter cookie into this melted goodness. While still soft, add two mini chocolate chips for eyes and one as a mouth. Again, set these on parchment paper until they firm up—your ghostly treats are coming together nicely!
Step 4: Craft Bats
Unwrap your Mini Reese’s Cups but don’t remove their inner lining; this will help hold everything together later. Open each Oreo cookie carefully and scrape out the creme filling (don’t toss this!). Break each cookie into halves; these will serve as wings! Spread some of that yummy creme filling onto your Reese’s Cup first. Attach two cookie halves using more creme filling as glue—these bats are going to look fantastic!
Step 5: Assemble Your Board
Now comes the fun part! Begin by placing your skeleton diagonally across your serving board—this is your centerpiece! Stuff its rib cage with assorted candy for added flair. Then arrange your larger decorated treats around it; think creatively about spacing! Finally, fill any gaps with all those colorful candies you prepared earlier.
Step 6: Serve & Enjoy!
Once everything is assembled, step back and admire your work! This Halloween Charcuterie Board isn’t just eye-catching—it’s full of delicious goodies ready for everyone to enjoy! Perfect for sharing laughs and spooky stories while indulging in sweet treats.
Enjoy creating this festive centerpiece that brings joy and sweetness into your celebration!
Pro Tips for Making Halloween Charcuterie Board
Creating a spooky and delightful Halloween Charcuterie Board is all about creativity and fun! Here are some tips to help you make it the star of your Halloween gathering.
-
Plan Your Layout: Before you start assembling, visualize your board’s layout. This helps in creating a balanced look and ensures that all treats are visually appealing and easy to access.
-
Mix Textures: Incorporating various textures, such as crunchy pretzels, soft chocolate treats, and chewy gummies, adds depth to your board. This variety keeps your guests engaged and excited to try different items!
-
Use Seasonal Colors: Stick to a color palette of black, orange, purple, and green. Using these colors not only enhances the Halloween theme but also makes the board visually striking.
-
Keep It Kid-Friendly: Ensure that all ingredients are suitable for all ages. Avoid any choking hazards or overly spicy items; you want everyone to enjoy without worry!
-
Encourage Creativity: Let guests create their own combinations from the board! Providing toothpicks or small cups can inspire fun mixing and matching of flavors.
How to Serve Halloween Charcuterie Board
Serving your Halloween Charcuterie Board is half the fun! Here are some ideas to make your presentation memorable.
Garnishes
- Fresh Herbs: Sprinkle fresh mint or parsley around the edges for a pop of color and freshness.
- Edible Flowers: Use edible flowers like pansies or nasturtiums to add a whimsical touch that enhances the festive atmosphere.
Side Dishes
- Spooky Veggie Platter: A mix of carrots, cucumbers, and bell peppers cut into fun shapes can provide a healthy contrast to the sweetness of the charcuterie board.
- Pumpkin Soup Shots: Serve warm pumpkin soup in small cups for a cozy addition that pairs perfectly with sweet treats.
- Ghostly Cheese Ball: A cheese ball shaped like a ghost can be an excellent savory companion that complements the sweetness of your board.
- Witch’s Brew Punch: Create a non-alcoholic punch with apple cider, ginger ale, and floating fruit slices for a refreshing drink option that ties into the theme.
With these tips on presentation and sides, you’ll be well on your way to hosting a fabulous Halloween party! Enjoy assembling this festive charcuterie board with family and friends—it’s sure to be a hit!
Make Ahead and Storage
The Halloween Charcuterie Board is not only a visual delight but also an excellent option for meal prep. You can prepare many of the components ahead of time, making it easier to assemble when it’s party time!
Storing Leftovers
- Store any leftovers in an airtight container at room temperature for up to 2 days.
- If refrigerated, consume within 3 days to ensure freshness.
Freezing
- It’s best to avoid freezing completed treats as they may lose texture. However, you can freeze individual components like chocolate-dipped items before assembling.
- Wrap these treats tightly in plastic wrap and place them in a freezer-safe bag. They can be frozen for up to one month.
Reheating
- If you choose to reheat any chocolate-dipped items, do so gently in the microwave at low power in short bursts (10-15 seconds) until just warm.
- Avoid reheating items with candy eyes or delicate decorations as they may melt.
FAQs
Here are some common questions you might have about creating your Halloween Charcuterie Board.
Can I customize my Halloween Charcuterie Board?
Absolutely! This Halloween Charcuterie Board is versatile, allowing you to swap out candies and treats based on your preferences or dietary needs.
How long does it take to prepare the Halloween Charcuterie Board?
The preparation time for this Halloween Charcuterie Board is approximately 120 minutes, making it a fun project to tackle before your festivities!
What should I serve with my Halloween Charcuterie Board?
While the board itself is quite festive and indulgent, consider pairing it with some seasonal beverages like apple cider or a spooky punch for added fun!
Can kids help with assembling the Halloween Charcuterie Board?
Definitely! This recipe is kid-friendly and offers many opportunities for little hands to get involved—perfect for family bonding time during the holiday!
Final Thoughts
I’m so excited for you to dive into making this whimsical Halloween Charcuterie Board! It’s not just a treat; it’s an experience that brings everyone together in a fun and festive way. I hope you enjoy the creative process as much as the delicious outcome! Don’t forget to share your spooky creations with friends and family—happy haunting!
Halloween Charcuterie Board
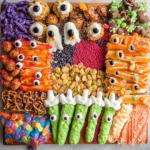
Get ready to celebrate Halloween with a delightful Halloween Charcuterie Board that’s sure to impress both kids and adults! This vibrant spread features an assortment of fun, spooky treats, from monster rice krispie treats to witch fingers made from pretzel rods. With colorful candies, chocolate-dipped goodies, and playful decorations, this board is perfect for any festive gathering or cozy movie night. It’s easy to prepare and can be customized based on your favorite treats, making it a fantastic family activity that brings everyone together. Let the creativity flow as you assemble an eye-catching centerpiece that invites laughter and indulgence.
- Prep Time: 60 minutes
- Cook Time: 0 minutes
- Total Time: 1 hour
- Yield: Approximately 12 servings 1x
- Category: Dessert
- Method: N/A
- Cuisine: N/A
Ingredients
- 8 rice krispie treats
- 5 ounces white chocolate melting wafers
- purple food dye
- candy eyes
- purple sprinkles
- 8 pretzel rods
- 10 ounces white chocolate melting wafers
- green food dye
- sliced almonds
- 8 Nutter Butter cookies
- 5 ounces white chocolate melting wafers
- mini chocolate chips
- 8 Mini Reese’s Cups
- 8 Oreo Thins
- 18 ounces Smarties
- 16 ounces red licorice
- 15 ounces Assorted Hershey's Candy
- 28 ounces sour pectin-based gummy candies
- 40 ounces candy corn
Instructions
- For the Monster Treats: Melt white chocolate wafers, mix in purple dye, dip rice krispie treats, and decorate with candy eyes and purple sprinkles. Set aside to firm up.
- For Witch Fingers: Melt more white chocolate with green dye. Dip pretzel rods and top with sliced almonds for nails. Allow to harden.
- For Ghosts: Dip Nutter Butter cookies in melted white chocolate, then add mini chocolate chips for eyes and mouth.
- For Bats: Attach Oreo halves to Mini Reese’s Cups using creme filling as glue.
- Assemble your charcuterie board by arranging all treats creatively around a skeleton centerpiece filled with assorted candies.
Nutrition
- Serving Size: 1 piece (50g)
- Calories: 200
- Sugar: 18g
- Sodium: 30mg
- Fat: 10g
- Saturated Fat: 6g
- Unsaturated Fat: 3g
- Trans Fat: 0g
- Carbohydrates: 26g
- Fiber: 1g
- Protein: 2g
- Cholesterol: 5mg