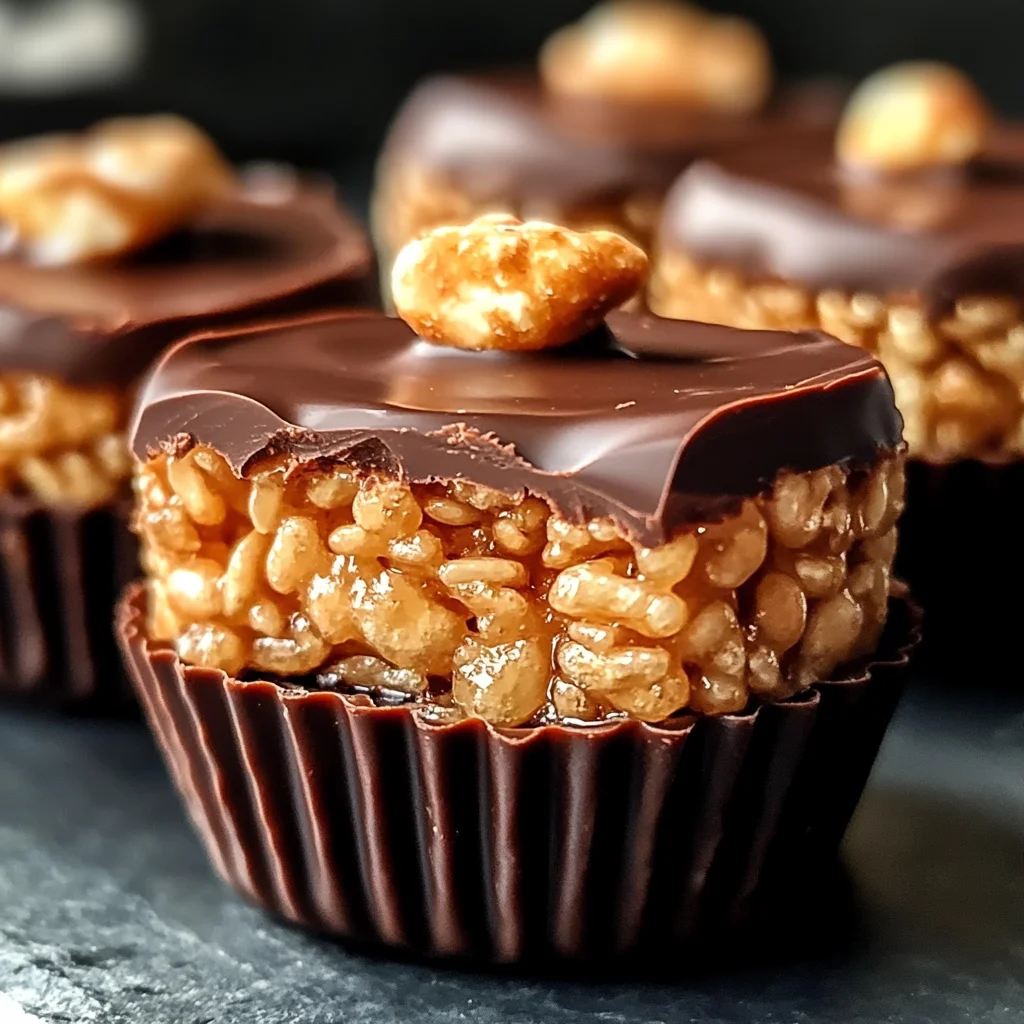
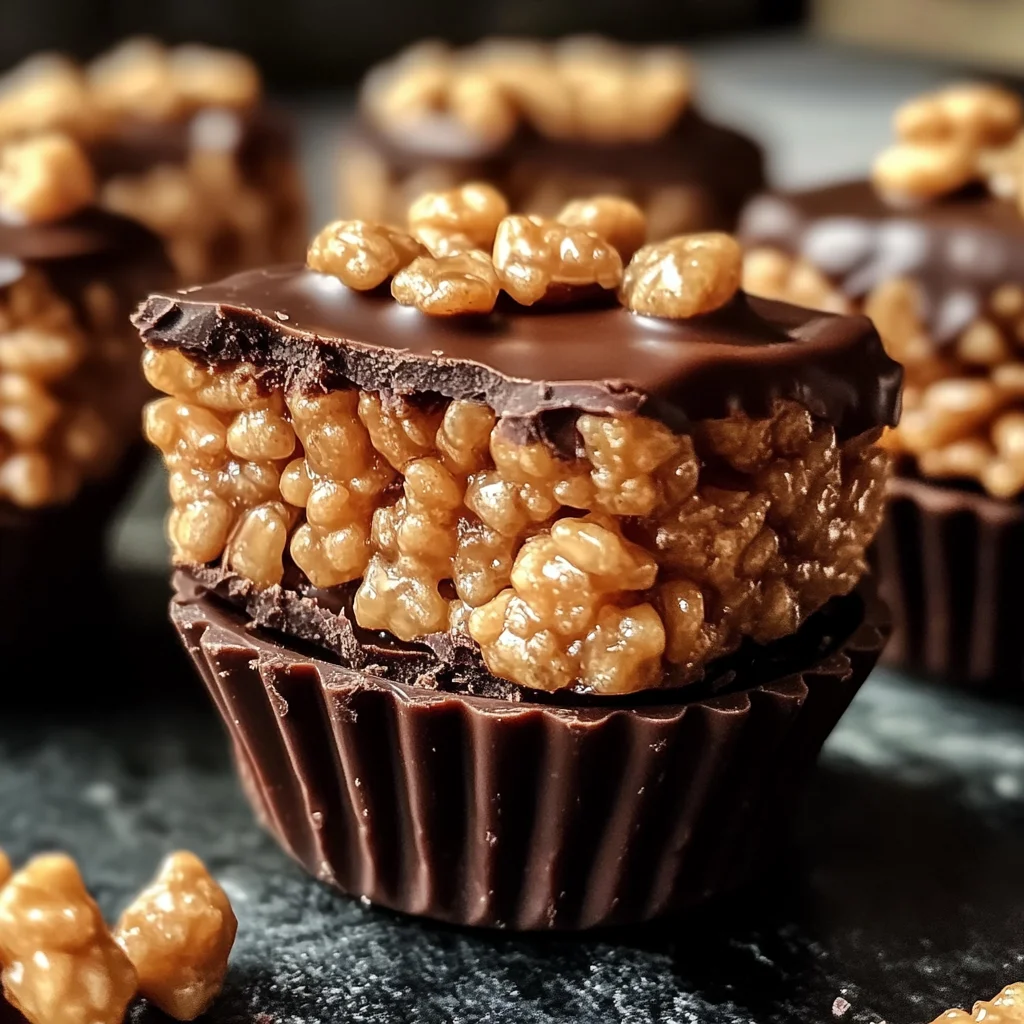
Chocolate Peanut Butter Rice Krispie Cups
If you’re looking for a treat that brings joy in every bite, let me introduce you to my beloved Chocolate Peanut Butter Rice Krispie Cups! These delightful little cups are perfect for any occasion, whether it’s a busy weeknight snack or a sweet addition to your next family gathering. The combination of creamy peanut butter, rich chocolate, and crispy Rice Krispies is simply irresistible. Whenever I make these, I can’t help but smile knowing they’ll be a hit with everyone!
What makes these cups even more special is their no-bake nature. You can whip them up in no time, making them an ideal solution for those last-minute dessert cravings. Trust me, once you try these Chocolate Peanut Butter Rice Krispie Cups, you’ll want to keep this recipe handy!
Why You’ll Love This Recipe
- Quick and Easy: This recipe takes only about 20 minutes from start to finish—perfect for busy days!
- Family-Friendly: The combination of chocolate and peanut butter delights kids and adults alike; it’s a treat everyone can enjoy.
- No Baking Required: Enjoy the fun of creating delicious treats without turning on the oven.
- Perfect for Any Occasion: Whether it’s a party or just a snack at home, these cups fit right in.
- Make Ahead Convenience: You can prepare them in advance and store them for later enjoyment, making your life easier!
Ingredients You’ll Need
These Chocolate Peanut Butter Rice Krispie Cups are made with simple and wholesome ingredients that you may already have in your pantry. Here’s what you’ll need:
For the Cups:
- 3 cups Rice Krispies cereal
- 1 cup creamy peanut butter
- 1/2 cup unsalted butter
- 1 cup mini vegan marshmallows
- 1 cup chocolate chips
- 1/2 tsp vanilla extract (optional)
- Pinch of sea salt (optional)
Variations
One of the best things about this recipe is its flexibility! Feel free to get creative with different flavors and additions. Here are some fun ideas:
- Add Some Crunch: Toss in some chopped nuts or seeds for added texture and flavor!
- Switch Up the Chocolate: Use white chocolate or dark chocolate chips for a different taste experience.
- Mix in Some Flavors: Incorporate a bit of almond or hazelnut extract for an extra layer of deliciousness.
- Go Nut-Free: Substitute sunflower seed butter if you’re looking for a nut-free alternative.
How to Make Chocolate Peanut Butter Rice Krispie Cups
Step 1: Melt the Base
In a medium saucepan over low heat, melt the unsalted butter along with the vegan marshmallows. Stir consistently until everything is smooth and combined. This step is crucial as it ensures that your base is creamy and ready to mix with the cereal.
Step 2: Add Peanut Butter
Once your mixture is smooth, stir in the creamy peanut butter and vanilla extract (if you’re using it). Mix until fully combined. This creates that deliciously rich flavor that pairs perfectly with the crispy cereal.
Step 3: Mix with Cereal
Pour your melted mixture over the Rice Krispies in a large bowl. Gently fold everything together until all the cereal pieces are coated evenly. It’s important to be gentle here; you want to keep those crispy textures intact!
Step 4: Shape the Cups
Line a muffin tin with paper liners. Spoon your mixture into each liner, pressing down gently to form a flat surface. This helps shape them into cups that will hold their form once set.
Step 5: Add Chocolate Layer
Melt the chocolate chips in the microwave using 20-second intervals, stirring between each until smooth. Spoon this melted chocolate over each cup and spread it evenly. If you like, sprinkle a pinch of sea salt on top for an extra touch.
Step 6: Set & Serve
Now comes the hardest part—waiting! Allow your cups to cool at room temperature for about 20 minutes or pop them into the refrigerator to set faster. Once they are firm, remove them from their liners and enjoy your delightful creations!
Now you’ve got yourself a batch of delectable Chocolate Peanut Butter Rice Krispie Cups ready to share (or not!). Enjoy!
Pro Tips for Making Chocolate Peanut Butter Rice Krispie Cups
These delightful treats are a breeze to whip up, but a few handy tips will ensure they turn out perfectly every time!
-
Use Fresh Ingredients: Ensure your Rice Krispies and chocolate chips are fresh for the best taste and texture. Stale ingredients can lead to a less satisfying crunch.
-
Don’t Overheat the Mixture: When melting the butter and marshmallows, keep the heat low and stir continuously. This prevents burning and helps maintain that creamy consistency.
-
Press Firmly: When shaping the cups, press the mixture down firmly into the muffin tin. This helps them hold their shape when set, making them easier to remove later.
-
Experiment with Chocolate: Feel free to mix different types of chocolate chips—dark, semi-sweet, or even white chocolate alternatives—for a unique flavor twist.
-
Chill for Extra Firmness: If you prefer firmer cups, after they’re set at room temperature, pop them in the fridge for an extra 15-20 minutes before serving. This makes them easier to handle!
How to Serve Chocolate Peanut Butter Rice Krispie Cups
Serving these Chocolate Peanut Butter Rice Krispie Cups is just as fun as making them! Here are some ideas that will wow your family and friends.
Garnishes
- Chopped Nuts: Sprinkle some chopped peanuts or almonds on top of the chocolate layer for added crunch and flavor.
- Drizzle of Nut Butter: A light drizzle of extra peanut butter or almond butter creates a beautiful presentation and enhances that nutty flavor.
- Coconut Flakes: Toasted coconut flakes can add an exotic touch and a delightful chewiness to each bite.
Side Dishes
-
Fresh Fruit Salad: Pairing these cups with a refreshing fruit salad balances out the sweetness. The natural juiciness from fruits like berries and melons complements the rich cups perfectly.
-
Vegan Yogurt Parfait: Layering vegan yogurt with granola and fresh fruits makes for a delicious side that adds creaminess—perfect for brunch gatherings!
-
Veggie Sticks with Hummus: For a savory contrast, serve crisp veggie sticks (like carrots, celery, and bell peppers) with hummus on the side. It provides a healthy crunch alongside these sweet treats.
With these tips and serving ideas in hand, your Chocolate Peanut Butter Rice Krispie Cups are sure to be a hit at any gathering! Enjoy every bite!
Make Ahead and Storage
These Chocolate Peanut Butter Rice Krispie Cups are perfect for meal prep! You can whip up a batch in no time and have a delicious treat ready whenever you need it. Here’s how to keep them fresh:
Storing Leftovers
- Store your Rice Krispie cups in an airtight container at room temperature for up to 5 days.
- If you live in a warm climate, consider refrigerating them to maintain their firmness.
Freezing
- To freeze, place the cups in a single layer on a baking sheet and freeze until solid.
- Once frozen, transfer them to a freezer-safe bag or container; they can be stored for up to 2 months.
- Label the container with the date for easy tracking!
Reheating
- These treats are best enjoyed at room temperature but can be slightly warmed if desired.
- Microwave them for about 10-15 seconds if you want a gooey texture—just be careful not to overheat!
FAQs
If you have questions about making these delicious Chocolate Peanut Butter Rice Krispie Cups, you’re not alone. Here are some common queries:
Can I use crunchy peanut butter instead of creamy?
Yes, you can absolutely use crunchy peanut butter! It will add some extra texture and flavor to your Chocolate Peanut Butter Rice Krispie Cups.
How do I know when my Rice Krispie Cups are set?
Your cups will feel firm to the touch after cooling. If you’ve placed them in the fridge, they should set within an hour. Enjoy your homemade Chocolate Peanut Butter Rice Krispie Cups once they’re nice and firm!
What can I substitute for vegan marshmallows?
If vegan marshmallows aren’t available, you can use regular mini marshmallows. Just be sure they meet your dietary preferences.
Can I add other mix-ins to the recipe?
Absolutely! Feel free to add nuts, dried fruit, or even a sprinkle of coconut to personalize your Chocolate Peanut Butter Rice Krispie Cups.
Final Thoughts
I hope this recipe brings as much joy to your kitchen as it has to mine! The combination of creamy peanut butter and rich chocolate is simply irresistible. Whether you’re making these for yourself or sharing with friends and family, I can’t wait for you to try this delightful treat. Happy cooking, and enjoy every sweet bite!
Chocolate Peanut Butter Rice Krispie Cups

Indulge in the delightful ease of making Chocolate Peanut Butter Rice Krispie Cups, a fun no-bake treat that combines the rich flavors of creamy peanut butter and luscious chocolate with the satisfying crunch of Rice Krispies. Perfect for busy days or special gatherings, these cups can be whipped up in just about 20 minutes, making them an ideal choice for a quick dessert. The best part? They require no baking, so you can enjoy this sweet creation without ever turning on your oven. Whether you’re treating yourself or sharing them with friends and family, these Chocolate Peanut Butter Rice Krispie Cups are sure to bring smiles to everyone’s faces!
- Prep Time: 10 minutes
- Cook Time: None
- Total Time: 0 hours
- Yield: Approximately 12 servings (each serving is one cup) 1x
- Category: Dessert
- Method: No-Bake
- Cuisine: American
Ingredients
- 3 cups Rice Krispies cereal
- 1 cup creamy peanut butter
- 1/2 cup unsalted butter
- 1 cup mini vegan marshmallows
- 1 cup chocolate chips
Instructions
- In a medium saucepan over low heat, melt unsalted butter and vegan marshmallows together until smooth.
- Stir in creamy peanut butter until fully combined.
- Pour mixture over Rice Krispies in a large bowl; gently fold until cereal is evenly coated.
- Line a muffin tin with paper liners and spoon the mixture into each liner, pressing down gently.
- Melt chocolate chips in the microwave and spoon over each cup; sprinkle with sea salt if desired.
- Allow to cool at room temperature for about 20 minutes or refrigerate until set.
Nutrition
- Serving Size: 1 serving
- Calories: 190
- Sugar: 12g
- Sodium: 80mg
- Fat: 9g
- Saturated Fat: 4g
- Unsaturated Fat: 4g
- Trans Fat: 0g
- Carbohydrates: 25g
- Fiber: 1g
- Protein: 3g
- Cholesterol: 15mg